
Windows Enterprise Setup + My Edge Policies
This guide contains information for setting up Windows 11 Enterprise. It also includes Edge Policies which I prefer to keep enabled.
Last updated on Saturday, August 24, 2024
This guide contains information for setting up Windows 11 Enterprise ↗. You can also use it at Home for doing important work. Since there are thousands of GPOs and settings in windows, I won’t be covering all of them. Keeping that in mind, most of the policies which are privacy invasive and increase attack surface have been taken care of in this guide. If you have any doubts or you think after enabling a certain policy your tools/software which you daily use isn’t working. Then you may go back to certain policy and disable it. You can always re-enable/disable in GPOs!
I will be activating Windows using MAS (Microsoft Activation Scripts) ↗ from massgrave.dev. It’s open-source and free. Porbably your best bet if you’re a individual who won’t get a Enterprise build from MS.
Let’s start by getting an Enterprise copy of Windows 11. After that I will move over to setup my Edge Enterprise Policies. Then with GPO we will disable most (almost all) of the privacy invasive stuff & work on Microsoft’s ASR (Attack Surface Reduction) GPOs.
Getting A Copy Of Windows 11 Enterprise for setup!#
-
First and foremost you have to check which CPU architecture are you using. In case you don’t know, i386 and i686 are both 32-bit, x86_64 is 64-bit and aarch64/armv7a are ARM builds!
- If you are using Windows. Open a terminal by running it as Administrator. Type
systeminfoand press enter. Look for line containingSystem Type:. If it saysx64then you need ax64build of Windows 11. Vice-versa for aarch64, ARM builds. - For Mac users who want to use Windows 11 Enterprise. The simplest way to find out would be by first clicking on the Apple logo at the top left of the the screen and then clicking on about this Mac. Check the line where
Chip:is written, if it saysApple M1or a number greater 1 then you need ARM build of Windows 11 for installation, if it’s a intel, you need x64 build. - If you’re on a Linux distribution, you can find out system architecture by opening a terminal and entering
uname -m
- If you are using Windows. Open a terminal by running it as Administrator. Type
-
After completing first step you should be ready to get ISO image for Windows!
- On windows you can get ISO image by Windows Media Creation Tool ↗
- For Mac you can download CrystalFetch from App Store. Once you are able to install CrystalFetch ↗ then you can download Windows 11 Enterprise for x64 and Arm systems.
- On Linux visiting Windows 11 Enterprise Page and giving your Company/Organisation information for downloading. I don’t know any other way for downloading Windows on Linux. You can create a pull request and change this point if you know of any.
- Now we need to flash Windows 11 ISO image to a flash drive (8/16 GB of storage would be enough). Use BalenaEtcher (Mac, Linux) or Rufus (Windows) for flashing ISO image to a flash drive.
- Next step would be to enable secure boot and TPM for performing basic security checks needed after a successful boot. TPM not just it helps in integrity checks of OS but it also manages Bitlocker keys. Enable it before procceding else you won’t be able to install Windows. You can enable it in motherboards bios settings by pressing del or F10/F11, depending on your motherboard. For more information read our manufacturer’s manual.
- Turn off your PC and connect your flash drive. It’ll likely show you “press any key to enter CD” so you may press any until you enter on windows 11 setup screen. If you don’t see it then click F11 or whichever key needed as per your motherboard to enter flash drive by changing boot order.
- Install Windows 11 by pressing next as many times as needed. The only step where you need to stop for a minutre would be Partition Table. If you have anything on your drive then you may first back it up because it will format your entire drive. If you don’t need anything, click on format and keep pressing next until you come to “your system is getting ready” screen.
- Uncheck all the privacy invasive options you will see after first boot. There will be around 5-6 options in total. Turn every single one of them off. You can also do them later in the settings or in GPOs. Know that you can’t disable all of them in windows professional.
-
Now you need to install Windows GPO template for applying policies. Search for Windows administrative templates for your particular build. You will come across a Microsoft official page from where you can download and install them. Since I’m using Win 11 23H2 I will be downloading administrative builds for that particular version. Follow this guide ↗ if you have any issues.
-
I would also recommend to install MS Edge Policies while setting up GPO template for your windows. You can find the deatiled write up for it here ↗
-
Now that you have installed all the GPO Administrative Templates. You can start editing them by opening up “Edit group ploicy”
Edge Browser With Super Duper Secure Mode#

Edge ↗ should be your MAIN browser on Widnows. It’s one of the most secure browser once you enable super duper secure mode by Microsoft. You can learn more about it from this great article by Johnathan Norma ↗. You’re basically making a trade-off when it comes to performance but it’s not by much and you should enable it because it will disable JIT V8 comepletely. This will reduce attack surface significantly. Most of the CVEs in recent years (At least 40-45%) wererelated to Just-In-Time compiler in browsers. You can disable JIT in other Chromium browsers (V8 Optimizer perms). Although, I haven’t tried it with others, it usually works it’s just that on MS edge you can keep it enable it for some sites while on other browser it will disable it completely. I will keep it disable all the way as I can wait few milliseconds and I don’t see it affecting my daily usage.
Another thing to know is, you don’t need more than one browser for browsing day to day stuff. Installing more than two, only increases your attack surface. Remember you’re installing another JavaScript execution evnvironment. You will need to keep it up to date with security patches because if you don’t then you’re a part of the problem. Edge can also be used in Windows Sanboxed Environment (Assuming your CPU allows for Virtualization). For visiting insecure websites you can make use of Windows Sanboxing and then close it when you’re done. Keep in mind that you will lose everything in that environment once closed. Save important files or anything on Host Machine.
Edge is a secure browser, not a privacy oriented browser. Privacy would go to Tor but then you wouldn’t be here reading this write-up if your threat model was making use of Tor daily, use Linux for it. If you’re a open-source bro who doesn’t prefer MS for browsing then you can take a look at FireFox from MS store as it is sandboxed properly (Probably the most secure sandboxed version of FireFox is on MS Store). I won’t be mentioning certain policies which are niche. For example, disabling developer tools in Edge isn’t applied much because of development requirements.
Edge Policies#
| Setting | GPO | Policiy State |
|---|---|---|
| Cast | Disable Dial Protocol | Disbaled |
| Enable Google Cast | Disabled | |
| Content settings | Configure Cookies | Enabled - Keep cookies for the duration of the session, except ones listed in ‘SaveCookiesOnExit’ (Save cookies when Microsoft Edge closes) |
| Control use of File System API for reading | Enabled - Don’t allow any site to request read access to files and directories via the File System API | |
| Control use of File System API for reading | Enabled - Don’t allow any site to request read access to files and directories via the File System API | |
| Default geolocation Setting | Enabled - Don’t allow any site to track users’ physical location | |
| Control use of insecure content exceptions | Enabled - Don’t allow any site to track users’ physical location | |
| Control use of Javascrip JIT | Enabled - Do not allow any site to run JavaScript JIT (This only disables JIT, not JS. All sites should work just fine) | |
| Default setting for third-party storage partitioning | Let third-party storage partitioning to be enabled. | |
| Control use of Web Bluetooth API | Enabled - Do not allow any site to request access to Bluetooth devices via the Web Bluetooth API | |
| Control use of WebHID API | Enabled - Do not allow any site to request access to HID devices via the WebHID API | |
| Control use of WebUSB API | Enabled - Do not allow any site to request access to USB devices via the WebUSB API | |
| Edge Website Typo Protection settings | Configure Edge Website Typo Protection | Disabled (This will disable it by deafult and leave it upto users to enable if they want to use it) |
| Experimentation | Configure users ability to override feature flags | Eanbled - Allow users to override feature flags |
| Extensions | Control which extensions cannot be installed | Enabled - Show - * (This will not allow to use any extension. If you want to install any of you extension you need to add it’s ID in “Allow specific extensions to be installed.” Most OUs keep it disabled because it increases attack surface) |
| Games settings | Enable Game Mode | Disabled |
| HTTP Authentication | Windows Hello for HTTP Auth Enabled | Disabled |
| Immersive Reader settings | - | Disable it ALL, if you don’t use them |
| Allow Microsoft Edge management service user policies to verride policies set through an enrollment token | Disabled | |
| Manageability | Microsoft Edge management | Disabled |
| Mobile App Management Enabled | Disabled | |
| Password manager and protection | Enable saving passwords to the password manager | Disabled |
| Performance | Efficiency mode enabled | Enabled ( You should keep it disabled if you’re using a PC and don’t mind it using resources. It’s personal preference here.) |
| Private Network Request Settings | Specifies whether to allow websites to make requests to more private-network endpoints | Disabled |
| SmartScreen settings | Configure Microsoft Defender SmartScreen | Disabled (It’s quite privacy invasive. Better to disable it in main windows settings also) |
| Startup, home page and new tab page | This is ALL personal preference and you should change it as per your liking |
Windows Settings#
- Start by removing all the app you don’t need including MS Apps like paint, Xbox, etc. To uninstall, go to Settings - Apps - Install Apps - Uninstall by selecting the app you want to remove.
- Go to personalization and change Windows to Light/Dark mode with your favorite wallpaper from App Store or download and change it manually.
- Next search Change user account control settings in the search bar and move the bar to it’s highest.
- Move to Privacy & Security and check every single permission there. Disable those that you don’t need or allow only those app that would require access. I personall disable everything here as I don’t need most of those permission.
- Move to the last option which is Windows Update. Open it and select Advanced options and check the boxes which says “Recieve updates for other Microsoft products” and “Notify when restart is required to finish updating”
- You should also enable Sandboxing of Microsoft Defender as explained by MS here ↗ Many attackers in the past have made use of MS’s Defender Antivirus content parsers that could enable arbitrary code execution. AV runs with high privileges, making it a hot traget for attackers. Any malacious process would be isolated in case there’s a compromise.
- Make sure to keep your apps up to date from MS store and also disable any extra feature that you don’t need by searching for additional features in search box and disabling anything you don’t require.
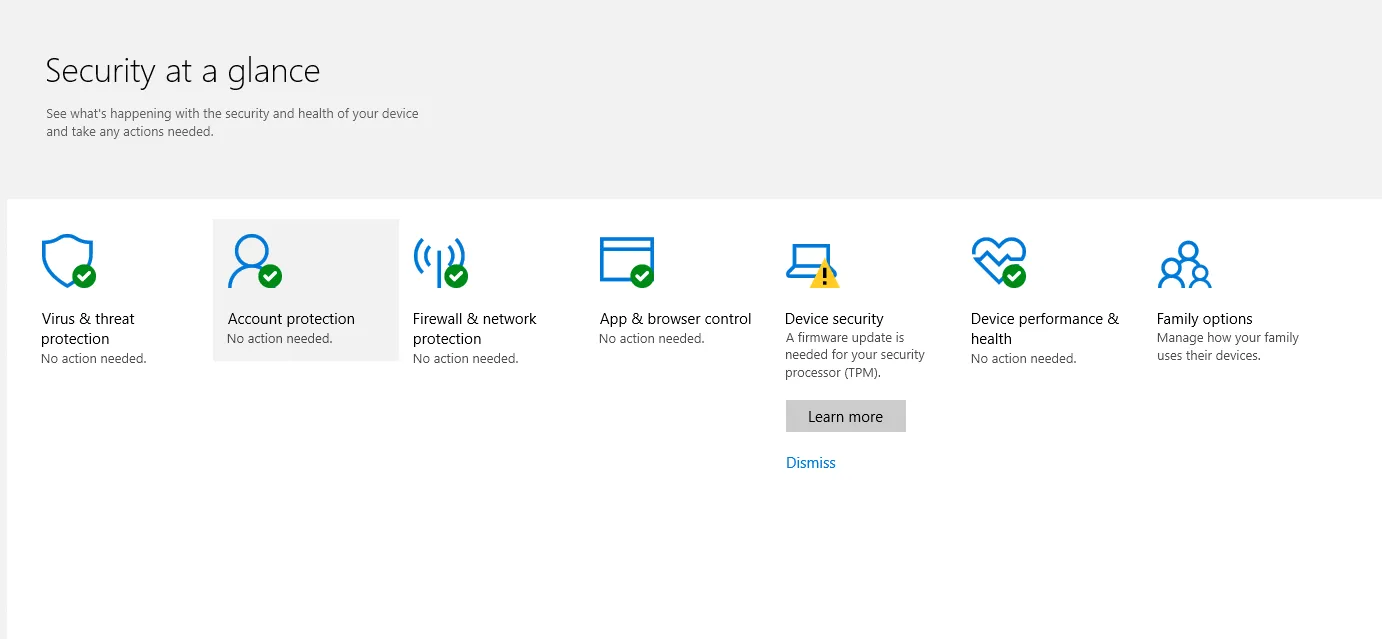
- Coming to MS’s Defender Antivirus that handles all the Windows Security settings. Let’s harden it!
- Virus & threat protection settings Disable “Cloud-Delivered protection” and “Automatic sample submission” I don’t want to send the exact path of my files and hashes to a MS server I don’t know anything about. Other than these two you should enable all of them, including the “Controlled folder access” option found at the bottom. It will protect your files in case there’s a ransomware threat.
- Firewall & network protection select each network by clicking them one by one. Then select the option “Block all incoming connections” for each.
- App & browser control “Smart App Control” is privacy invasive IMO, I personally keep it “Off”. Coming to “Reputation-based protection” I find it privacy invasive as it sends file path and hashes to MS. I keep all of them disabled. You should turn everything on in “Exploit protection” to “On by default”.
- You should also Turn on Bitlocker for your C drive and save the recovery key safely. Don’t keep recovery key on your main machine. You will need it in case of Windows Recovery, you will use it to decrypt your data.
- Last things you should take care of is Apps. Do not install apps that you don’t know anything about. First you should check if you App is available as a PWA (Progressive Web Apps). If it is, then avoid installing it separately and use it as a browser app. Installing Electron apps separately will only make you more vulnerable. For example, Whatsapp Web give you a option to use Whatsapp separately as a web app. It works as good as their regular app without any installation of their binary files on to system. Even notifications work great. Check out your apps, if they have a PWA.
Windows GPO & WDAC#
I came accross this GitHub Repositery By Starchturrets ↗ which has policies for Windows. This repo also contains a basic WDAC Policy srcipt. If you’re making use of WDAC policies, make sure you are using the Deafult Windows Mode mentioned there. It doesn’t break anything for me, you should first try using all your apps for a day, if nothing breaks then keep it enabled. I’m using 3rd template and also making use of falsely blocked allowlist to enable apps flagged because of a false positive. WDAC notes are well versed and explained line by line, you should check them out here.
The most important policies you should consider when setting up Windows in an Enterprise Worksapce is CIS (Center of Internet Security) Windows Security Baseline ↗. They have also provided a complete list ↗ with detailed explanation. You will need to check and make sure everything is working afterwards because if it doesn’t you need to troubleshoot the issue yourself. If you want to create a final policy for all the systems and have the most control then be ready for fixing any issues you will come accross down the line.
You may open a PR for any typos or correction that is needed.